Smart Thermostat Home Assistant Wiring for Reliability
By Aiko Tanaka • 28th Oct
When your furnace kicks on at 3 AM during a January freeze, you don't want to discover your smart thermostat relies on a cloud connection that's down. I've built dozens of advanced thermostat automation systems that keep homes comfortable even when the internet vanishes, because true comfort isn't contingent on outside servers. In this deep dive, I'll share wiring strategies that eliminate single points of failure while maintaining full Home Assistant integration. Let's architect reliability from the ground up.
Why Local Wiring Architecture Matters More Than You Think
Home Assistant gives you unprecedented control over HVAC systems, but most implementations create dangerous dependencies. That "smart" thermostat on your wall? If it's designed to phone home before turning on your furnace, you've got a ticking time bomb. During a recent storm that darkened entire neighborhoods, I watched neighbors pound their phones as their cloud-dependent systems spun uselessly, while my client's radiant floor system pre-warmed their nursery via local HomeKit schedules running on Thread. If the WAN dies, what still works?
Q: How do I verify compatibility between Home Assistant and my specific HVAC system before wiring?
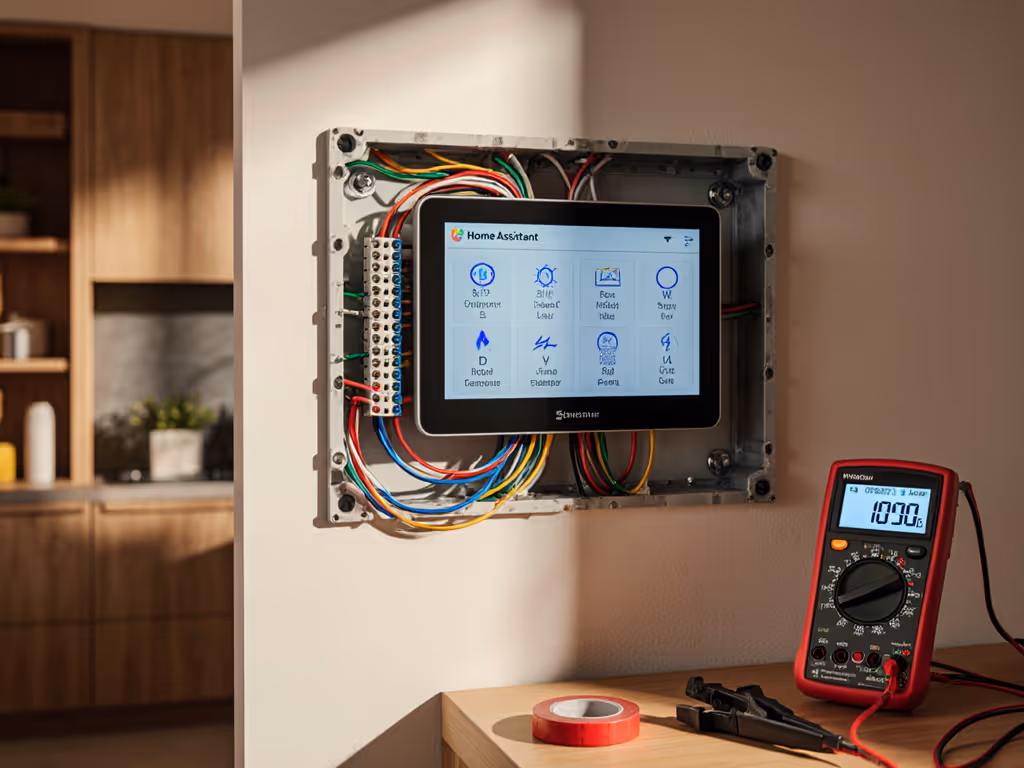
A: Start with a dependency diagram, not a compatibility list. Home Assistant doesn't "talk to thermostats"; it interacts with discrete electrical signals. Create this three-column checklist: If you're unsure about system compatibility or C-wire needs, see our thermostat compatibility guide.
- Your HVAC Control Board's Terminal Map (photograph it before disconnecting wires)
- Thermostat Wiring Requirements (24V system? Heat pump? O/B reversal?)
- Home Assistant's Input Expectations (via generic_thermostat or climate components)
For heat pump systems, verify your thermostat's O/B terminal behavior matches Home Assistant's expectation through the
aux_coolingparameter. A mismatch here causes compressor lockout during cold weather.
Most failures occur when installers assume Home Assistant's generic_thermostat component matches physical wiring 1:1. It doesn't, it translates Home Assistant's digital logic into discrete signals. Document your exact staging:
- Single-stage furnace + AC?
- Two-stage heat pump?
- Emergency heat requirements?
- Humidifier/dehumidifier connections?
This architectural mapping prevents the #1 Home Assistant thermostat problem: silent failures where the UI shows "heating" but no voltage reaches your furnace.
Q: What's the most reliable wiring approach for Home Assistant thermostats to minimize failure points?
A: Implement a dual-mode architecture with manual fallback. Your wiring should function identically with or without Home Assistant running:
| Failure Mode | With Cloud Thermostat | With Home Assistant Local Architecture |
|---|---|---|
| Internet Outage | No heating/cooling | Full operation via local schedules |
| Home Assistant Down | No operation | Manual thermostat control remains |
| Power Outage | Battery backup (limited) | Same as cloud thermostat |
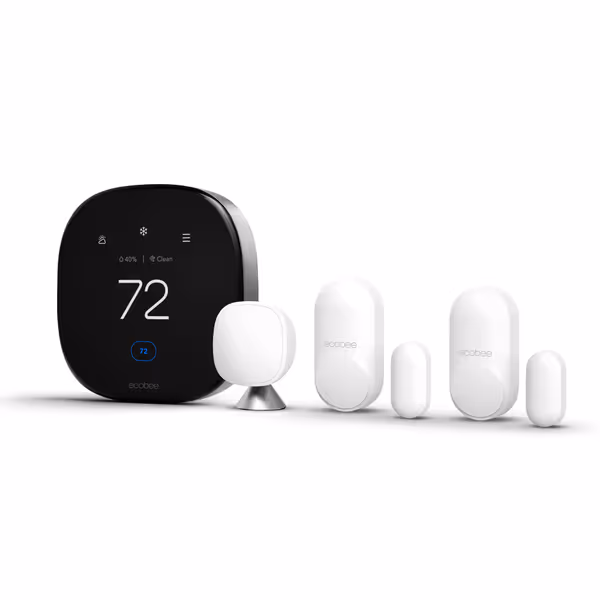
ecobee Smart Thermostat Premium
Smart thermostat with air quality monitoring and whole-home comfort control.
$249.99
Energy SavingsUp to 26% annually
Energy SavingsUp to 26% annually
Pros
Siri, Alexa, and HomeKit built-in for seamless smart home integration.
Included SmartSensor reduces hot/cold spots for improved comfort.
Built-in air quality monitor proactively maintains healthy indoor air.
Cons
Temperature accuracy can vary, with some users reporting discrepancies.
Customers find the thermostat easy to install, with simple wiring and seamless integration with smart home systems, particularly with Apple's HomeKit and Alexa. They appreciate its ease of use, with vacation settings being simple to set up, and its temperature adjustment features, including the ability to control from a phone and schedule heating and cooling. The functionality and temperature regulation receive mixed reviews - while some say it works flawlessly, others report it stops working, and while it can regulate house temperature, some note it's off by more than 7 degrees. Value for money opinions are divided between those who consider it a great money saver and those who find it expensive.
Customers find the thermostat easy to install, with simple wiring and seamless integration with smart home systems, particularly with Apple's HomeKit and Alexa. They appreciate its ease of use, with vacation settings being simple to set up, and its temperature adjustment features, including the ability to control from a phone and schedule heating and cooling. The functionality and temperature regulation receive mixed reviews - while some say it works flawlessly, others report it stops working, and while it can regulate house temperature, some note it's off by more than 7 degrees. Value for money opinions are divided between those who consider it a great money saver and those who find it expensive.
Key wiring principles:
- Always preserve the C-wire: 24VAC common is your lifeline. If your system lacks one, install a C-wire adapter before connecting your thermostat. That 24-hour battery life on some thermostats? Useless when your January outage lasts 72 hours.
- Isolate control logic: Use relays for high-voltage components (like line-voltage baseboards. A $5 optocoupler board prevents dangerous back-feeding into your thermostat.
- Document polarity: Photograph wire colors and terminal labels. The red wire isn't always "power"; in some systems it's 24VAC common.
I recently debugged a system where the installer connected W2 (auxiliary heat) to the thermostat's Y terminal. Result? The heat pump ran emergency heat exclusively, costing the homeowner $400/month in unnecessary electricity. A proper wiring diagram would have prevented this.
Q: How can I ensure my thermostat keeps working during internet outages?
A: Design for local execution first. Home Assistant's strength is its local execution capability, so leverage it:
- Configure on-device schedules via HomeKit or Matter (not cloud services)
- Use Thread mesh networks for temperature sensors (Zigbee often struggles, too many polling failures)
- Implement local-only automations that trigger directly from sensors to HVAC controls
The critical metric: If your router went dark right now, how many comfort functions would remain operational? Most homeowners score 0-20%. For proactive system health checks and alerts, explore smart thermostat diagnostics. With proper architecture, you should hit 80-100%.
Remember my storm story? The thermostat itself wasn't special, it was the wiring topology that let local schedules execute without cloud calls. When neighbors were lighting fireplaces, that family's hallway sensors triggered pre-heating based on Thread-connected occupancy data. No internet required.
Q: What's the cleanest way to integrate remote sensors with Home Assistant thermostat control?
A: Avoid "smart thermostat" features that require cloud processing. Instead, build a sensor network with local decision logic:
- Deploy Thread-bound temperature/humidity sensors in key zones (Nest, Eve, or HomeKit-compatible)
- Configure Home Assistant's generic_thermostat component to use the average of multiple sensors
- Set failure thresholds ("If sensor offline >30min, revert to primary sensor")
Rather than relying on a thermostat's "smart" algorithm, create a local automation that:
if occupied_room.temp < target_temp - 1.5°
 then activate_aux_heat = false
else if outside_temp < 20°F
 then activate_aux_heat = true
This approach eliminates the most common complaint: "My smart thermostat turns on emergency heat when it's 30°F outside because it doesn't understand my heat pump's capabilities."
Q: How do I configure Home Assistant to prevent short-cycling and equipment damage?
A: This is where local wiring shines over commercial thermostats. Home Assistant lets you implement true compressor protection:
# Critical safety parameters
min_cycle_time: 00:09:00 # 9 minutes minimum runtime
min_off_time: 00:03:00 # 3 minutes between cycles
Most Wi-Fi thermostats have hardcoded protection times (often 5 minutes), which causes short-cycling in high-efficiency heat pumps. With Home Assistant, you match protection times to your specific equipment, not a generic profile.
I worked with an HVAC technician who replaced three compressor boards in one winter because a "smart" thermostat ignored the manufacturer's 8-minute minimum runtime. His fix? A Home Assistant configuration with custom cycle timers. No more fried compressors.
Architecture First, Convenience Second
The most reliable thermostat systems I've designed have one thing in common: they treat the "smart" features as optional enhancements to a fundamentally sound electrical system. When your wiring topology respects the physics of HVAC operation, not just the promises of marketing copy, you get comfort that persists through outages, upgrades, and even platform changes.
Local first, cloud optional. Comfort shouldn't hinge on an outage. Every wire you run should answer the question: If the WAN dies, what still works?
Further Exploration
Ready to dive deeper into resilient HVAC automation? For long-term firmware and support considerations, see our analysis of smart thermostats with the longest support. I recommend studying Home Assistant's generic_thermostat component source code to understand its exact signal timing. Then, document your specific HVAC control board's timing requirements, many manufacturers publish these in technical manuals not available to consumers. The gap between these two documents is where reliability lives or dies. When you've mapped both, you'll make wiring decisions that keep your family comfortable for decades, not just until the next cloud outage.
Related Articles